


I have soldered a SAML11D15A to an SSOP breakout board and am trying to get some simple Atmel Studio 7 Example code to run on it.
I am using a J-Link Edu Mini with the latest firmware and the J-Link DLL is V6.34c.
I have followed the instructions on the Segger wiki to attempt to clear the RXN bit in the User Row to enable RAM execution of the re-flashing algorithm but this does not appear to work.
The J-Link can initially see a fresh SAML11D15A part running running from the internal 4MHz oscillator:
TIF>S
Specify target interface speed [kHz]. <Default>: 4000 kHz
Speed>400
Device "ATSAML11D15A" selected.
Connecting to target via SWD
InitTarget()
Found SW-DP with ID 0x0BF11477
Scanning AP map to find all available APs
AP[1]: Stopped AP scan as end of AP map has been reached
AP[0]: AHB-AP (IDR: 0x04770025)
Iterating through AP map to find AHB-AP to use
AP[0]: Core found
AP[0]: AHB-AP ROM base: 0x41003000
CPUID register: 0x411CD200. Implementer code: 0x41 (ARM)
Found Cortex-M23 r1p0, Little endian.
FPUnit: 4 code (BP) slots and 0 literal slots
Security extension: implemented
Secure debug: enabled
CoreSight components:
ROMTbl[0] @ 41003000
ROMTbl[0][0]: E00FF000, CID: B105100D, PID: 000BB4CB ROM Table
ROMTbl[1] @ E00FF000
ROMTbl[1][0]: E000E000, CID: B105900D, PID: 000BBD20 Cortex-M23
ROMTbl[1][1]: E0001000, CID: B105900D, PID: 000BBD20 DWT
ROMTbl[1][2]: E0002000, CID: B105900D, PID: 000BBD20 FPB
Cortex-M23 identified.
J-Link>
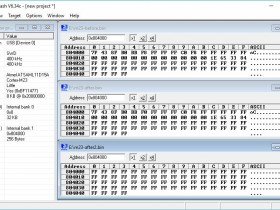
I then make a copy of 0x44 User Row bytes from 0x804000 and modify byte 5 from 0xF8 to 0xF0 (see J-Flash screenshot for before and after file modification and then after the erasing and re-writing process):
J-Link>savebin e:\m23-before.bin, 0x00804000, 0x44
Opening binary file for writing... [e:\m23-before]
Reading 68 bytes from addr 0x00804000 into file...O.K.
And then Erase the User Row at 0x804000:
J-Link>w4 0x4100501C 0x00804000
Writing 00804000 -> 4100501C
J-Link>w2 0x41005000 0xA502
Writing A502 -> 41005000
A problem occurs trying to write the modified binary file back into the User Row:
J-Link>loadbin e:\m23-after.bin, 0x804000
Downloading file [e:\m23-after.bin]...
****** Error: Timeout while checking target RAM, RAMCode did not respond in time. (PC = 0xFFFFFFFF, CPSR = 0xFFFFFFFF, LR = 0x01000003)!
Failed to prepare for programming.
Failed to execute RAMCode for RAM check!
Unspecified error -1
J-Link>
This appears to be game over as far as the chip is concerned as the User Row is now all 0xFF's and the J-Link can no longer connect to it:
TIF>S
Specify target interface speed [kHz]. <Default>: 4000 kHz
Speed>400
Device "ATSAML11D15A" selected.
Connecting to target via SWD
InitTarget()
Cold-Plugging detected
Cold-Plugging detected
InitTarget()
Cold-Plugging detected
Cold-Plugging detected
InitTarget()
Cold-Plugging detected
Cold-Plugging detected
InitTarget()
Cold-Plugging detected
Cold-Plugging detected
Cannot connect to target.
J-Link>
Afterwards, the part cannot be seen in Atmel Studio 7 - see attached dialog box Error message.
Having failed to get this procedure to work on 2 intially good SAML11D15A parts, I'd like to establish some instructions from SEGGER that work.

I am using a J-Link Edu Mini with the latest firmware and the J-Link DLL is V6.34c.
I have followed the instructions on the Segger wiki to attempt to clear the RXN bit in the User Row to enable RAM execution of the re-flashing algorithm but this does not appear to work.
The J-Link can initially see a fresh SAML11D15A part running running from the internal 4MHz oscillator:
TIF>S
Specify target interface speed [kHz]. <Default>: 4000 kHz
Speed>400
Device "ATSAML11D15A" selected.
Connecting to target via SWD
InitTarget()
Found SW-DP with ID 0x0BF11477
Scanning AP map to find all available APs
AP[1]: Stopped AP scan as end of AP map has been reached
AP[0]: AHB-AP (IDR: 0x04770025)
Iterating through AP map to find AHB-AP to use
AP[0]: Core found
AP[0]: AHB-AP ROM base: 0x41003000
CPUID register: 0x411CD200. Implementer code: 0x41 (ARM)
Found Cortex-M23 r1p0, Little endian.
FPUnit: 4 code (BP) slots and 0 literal slots
Security extension: implemented
Secure debug: enabled
CoreSight components:
ROMTbl[0] @ 41003000
ROMTbl[0][0]: E00FF000, CID: B105100D, PID: 000BB4CB ROM Table
ROMTbl[1] @ E00FF000
ROMTbl[1][0]: E000E000, CID: B105900D, PID: 000BBD20 Cortex-M23
ROMTbl[1][1]: E0001000, CID: B105900D, PID: 000BBD20 DWT
ROMTbl[1][2]: E0002000, CID: B105900D, PID: 000BBD20 FPB
Cortex-M23 identified.
J-Link>
I then make a copy of 0x44 User Row bytes from 0x804000 and modify byte 5 from 0xF8 to 0xF0 (see J-Flash screenshot for before and after file modification and then after the erasing and re-writing process):
J-Link>savebin e:\m23-before.bin, 0x00804000, 0x44
Opening binary file for writing... [e:\m23-before]
Reading 68 bytes from addr 0x00804000 into file...O.K.
And then Erase the User Row at 0x804000:
J-Link>w4 0x4100501C 0x00804000
Writing 00804000 -> 4100501C
J-Link>w2 0x41005000 0xA502
Writing A502 -> 41005000
A problem occurs trying to write the modified binary file back into the User Row:
J-Link>loadbin e:\m23-after.bin, 0x804000
Downloading file [e:\m23-after.bin]...
****** Error: Timeout while checking target RAM, RAMCode did not respond in time. (PC = 0xFFFFFFFF, CPSR = 0xFFFFFFFF, LR = 0x01000003)!
Failed to prepare for programming.
Failed to execute RAMCode for RAM check!
Unspecified error -1
J-Link>
This appears to be game over as far as the chip is concerned as the User Row is now all 0xFF's and the J-Link can no longer connect to it:
TIF>S
Specify target interface speed [kHz]. <Default>: 4000 kHz
Speed>400
Device "ATSAML11D15A" selected.
Connecting to target via SWD
InitTarget()
Cold-Plugging detected
Cold-Plugging detected
InitTarget()
Cold-Plugging detected
Cold-Plugging detected
InitTarget()
Cold-Plugging detected
Cold-Plugging detected
InitTarget()
Cold-Plugging detected
Cold-Plugging detected
Cannot connect to target.
J-Link>
Afterwards, the part cannot be seen in Atmel Studio 7 - see attached dialog box Error message.
Having failed to get this procedure to work on 2 intially good SAML11D15A parts, I'd like to establish some instructions from SEGGER that work.